Services
How to Add Co-Organizers to a Meeting in Microsoft Teams?
Target Audience: Iscte-IUL Community
Answer/Solution:
- New calendar
- Select Calendar inTeams.
- Select an event.
- Make sure the people you want to add as co-organizers are added as required attendees.
- Select Edit > More options.
- In Event, select Meeting options.
- In Roles > Choose co-organizers, search and select their names from the dropdown menu.
- Select Save.
- New calendar
- Classic Calendar
- Select Calendar inTeams.
- Select a a meeting or event.
- Make sure the people you want to add as co-organizers are added as required attendees.
- Select Edit.
- In the meeting description, press and hold ctrl and select Meeting options.
- In Roles > Choose co-organizers, search and select their names from the dropdown menu.
- Select Save.
- Classic Calendar
Note: Co-organizers must be in the same org as the meeting organizer. They can also use a guest account in the same org.
Further Information:
What can I do during a Teams meeting?
Target Audience: Iscte-IUL Community
Answer/Solution:
- Meeting controls
- Chat
- Present content
- Presenter modes
- Share slides
- Share sound
- Use video
- Apply video filters
- Mute and unmute
- Spotlight a video
- Multitasking
- Raise your hand
- Live reactions
- Take meeting notes
- Join a breakout room
- Customize your view
- Laser pointer
- Cast from a desktop
- Share physical resources
- Use a green screen
- Join as an avatar
- Customize your avatar
- Use emotes, gestures, and more
Further Information:
How do I Manage My Calendar in Teams?
Target Audience: Iscte-IUL Community
Answer/Solution:
Further Information:
How do I schedule a Teams Meeting?
Target Audience: Iscte-IUL Community
Answer/Solution:
Further Information:
How to take part in a Teams Meeting?
Público Alvo: Comunidade Iscte-IUL
Answer/Solution:
Further Information:
How to log in to Microsoft Teams
Atualizado/Updated: 2025-07-22
Target Audience: Iscte-IUL Community
Answer/Solution:
- Start Microsoft Teams.
- In Windows, select Start > Microsoft Teams.
- On Mac, open the Applications folder and select Microsoft Teams.
- On the web, go to https://teams.microsoft.com.
- Sign in with your username and password (e.g., xxnes@iscte-iul.pt and password).
Further Information:
Does swiping the card before the start of the lesson count towards attendance? And after the end of the lesson?
Target Audience: Iscte-IUL Students
Answer/Solution: For the registration to be valid, it must be made within the following time interval:
- 10 minutes before the start of the lesson until 10 minutes before the end of the lesson.
In other words:
- In a lesson that takes place from 8:00 to 9:30 am, registration must take place between 7:50 and 9:19 am.
- In a lesson that takes place from 9:30 to 11:00, registration must take place between 9:20 and 10:49.
How can I identify Iscte’s RFID readers? And what are they for?
Atualizado/Updated: 2025-12-31
Target Audience: Iscte-IUL Community
Answer/Solution:
- Door opening control system readers
These are applied to the doors of communal spaces (auditoriums, laboratories, classrooms, meeting rooms and dining rooms) and are used to open the doors.
- Door opening control system readers
- Readers for the student attendance control system
These are installed inside Iscte’s auditoriums, laboratories and classrooms and are used to record student attendance.
- Readers for the student attendance control system
- Print and copy service readers
These are applied/embedded in the self-service printing and copying system equipment and are used to access the equipment.
- Print and copy service readers
I’m a student at Iscte and I have the following question regarding class attendance: Do I swipe my card before or after the lecturer?
Atualizado/Updated: 2025-12-19
Target Audience: Iscte-IUL Students
Answer/Solution:
- The card swiped by the teacher at the reader outside the classroom only serves to open the classroom door.
- The card swiped by the student at the reader inside the classroom is used to record the student’s presence in class.
- For class attendance to be correctly recorded, the card must be swiped at the reader from 10 minutes before the start of the lesson until 10 minutes before the end of the lesson, i.e.:
- In a lesson from 8:00 to 9:30, the card must be swiped at the reader from 7:50 to 9:19;
- In a lesson from 9:30 to 11:00, the card must be swiped at the reader from 9:20 to 10:49.
Can’t share OneDrive files
Atualizado/Updated: 2025-07-08
Target Audience: Iscte-IUL Community
Answer/Solution: If you can’t share files from OneDrive, it could be because:
-
- You’ve reached your sharing limits;
- You need to validate your account;
- The item is in your Personal Vault;
- OneDrive is not running;
- Your organisation has disabled or restricted the programme.
Shall I save files in OneDrive or SharePoint?
Atualizado/Updated: 2025-07-08
Target Audience: Iscte-IUL Community
Answer/Solution:
-
- If you’re working on a file in isolation, save it to OneDrive. Your OneDrive files are private unless you share them with others, which is particularly useful if you haven’t created a team yet.
- If you’re already working in a team – in Microsoft Teams, SharePoint, or Outlook – you should save your files where your team works, because OneDrive for work or school also connects you to all your shared libraries.
How can I validate my Office365 account?
Atualizado/Updated: 2025-07-08
Target Audience: Iscte-IUL Community
If you’re having problems sending share emails, it may be due to validation problems with your Microsoft Account.
Answer/Solution:
- Go to https://account.live.com/reputationcheck to validate your Microsoft account.
- Make sure your Microsoft Account Profile is up to date and complete.
- Make sure you accept the “Terms of Use“, if requested.
How do I share Onedrive files from my Personal Vault?
Atualizado/Updated: 2025-07-08
Target Audience: Iscte-IUL Community
Answer/Solution:
-
- As the items in your Personal Vault are private, they cannot be shared.
- If you want to share an item stored in your Personal Vault, you’ll have to transfer it to a folder outside your Personal Vault and share it from there.
I can’t log in to the Colibri service
Atualizado/Updated: 2025-07-08
Target Audience: Iscte-IUL Community
Answer/Solution: If you are having problems logging in to the Colibri service, proceed as follows:
- In your web browser, open a private browsing window.
To open a private browsing window in Google Chrome or Microsoft Edge, you can use the keyboard shortcut “Ctrl+Shit+N”, or click on the icon with three dots, and click on “New private browsing window”.
- Go to colibri.fccn.pt and click on the “Sign in” button.
- You will be redirected to the institution selection page where you must select “Iscte” and log in with your Iscte account credentials (e.g. xxnes@iscte-iul.pt and the corresponding password).
If you manage to access the Colibri service successfully, follow these steps:
- Close the private browsing window.
- Go to Internet browser options and clear the browser cache.
- Close the web browser and open it again;
- Access and log in to the Colibri service.
Further Information: Read the following help articles to find out how to clear the cache:
An error occurred while trying to log in with SSO
Atualizado/Updated: 2025-07-08

Target Audience: Iscte-IUL Community
Answer/Solution:
- When this error message appears, it means that you have previously entered your institutional e-mail address on the ZOOM website.
- You will need to delete this account by following these steps:
- When this error message appears, it means that you have previously entered your institutional e-mail address on the ZOOM website.
- Log in to the Zoom web portal with your institutional e-mail address (SSO).
- In the navigation menu, click on “Account management” and then on “Account profile”.
- Click on “Close my account”.
- Click “Yes” to confirm that you want to close your Zoom account. This will delete your Zoom account permanently.
- You will be redirected to the Zoom homepage and a message will appear informing you that your account has been successfully closed.
- After this step the user can now access the colibri service: colibri.fccn.pt and perform federated authentication on the service.
Further Information: Click here
Confirm your e-mail address
Atualizado/Updated: 2025-07-08

Target Audience: Iscte-IUL Community
Answer/Solution:
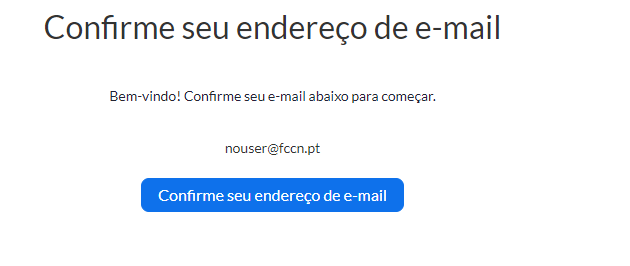
- When you log in to the Colibri service, you get the message: “Confirm your e-mail address”.
- You should contact us and ask for the necessary user attributes to be corrected in order to authenticate with the Colibri service.
Further Information: You can check your user attributes on the RCTSaai service website in the My Profile section.
How do I share if Onedrive isn’t installed or running?
Atualizado/Updated: 2025-07-08
Target Audience: Iscte-IUL Community
Answer/Solution: If the OneDrive desktop application is installed on your computer, you should see the “Share” option when you click on a file or folder in Explorer.
-
- If OneDrive is not running or the desktop application is not installed, you will not be able to share from File Explorer or the Finder.
- You can continue to share OneDrive files and folders from onedrive.com.
- If you don’t see the OneDrive icons in your taskbar or notification area, start OneDrive.
What is the difference between OneDrive and SharePoint?
Atualizado/Updated: 2025-07-08
Target Audience: Iscte-IUL Community
Answer/Solution:
-
- The similarities between the programs
-
- Sharepoint and OneDrive have similar cloud storage functions.
- Both offer enterprise-level protection and comply with the main data protection legislation.
-
- The main differences
-
- Sharepoint is a system for collaborative storage, focused on the needs of teams. OneDrive is a personal storage system, i.e. not collaborative.
- Sharepoint is a platform designed specifically to promote collaborative work in an online environment. It is a business environment in which employees share folders and files, including editing files simultaneously.
- Sharepoint’s usability is much broader than that of OneDrive, as it can be adapted to function as an intranet. It can also be integrated with Teams.
What are the differences between a BASIC, PRO or WEBINAR account?
Atualizado/Updated: 2025-07-10
Target Audience: Iscte-IUL Community
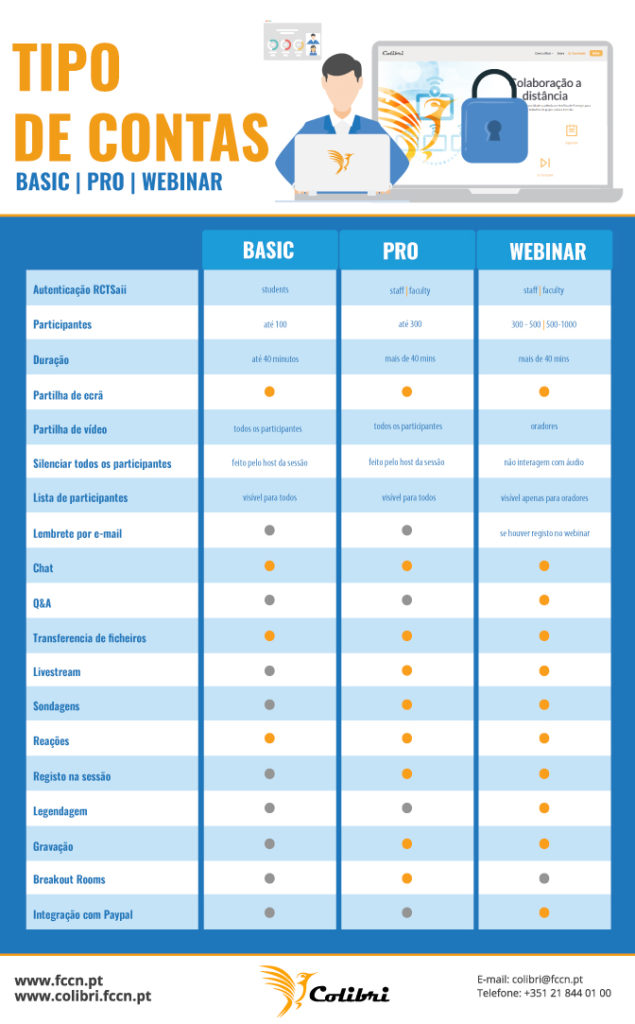
Answer/Solution: The Zoom account types used in Colibri videoconferencing are as follows:
Basic
-
-
- Meetings lasting a maximum of 40 minutes.
- Up to 100 participants per session.
- Students and researchers only have BASIC accounts.
-
Pro/Licensed
-
-
- Meetings with no maximum duration.
- Up to 300 participants per session.
- Possibility of recording in the cloud.
- Polls.
- Connection to videoconferencing terminals (H.323).
- Breakout rooms.
- Only available for “staff” or “faculty” (teachers) accounts.
-
Webinar
-
-
- By request only.
- Above 300 participants up to 1,000 per session.
- Possibility of recording in the cloud.
- Polls.
- Q&As
- Training room.
- Only available for “staff” or “faculty” (teachers) accounts.
-
With this comparative table, you can analyze the differences between these three accounts.

Further Information: Click here to checkt what type of account you have.
