FAQ
How to create and add an email signature in the new Outlook?
- Select Settings .
- Select Accounts > Signatures.
- If you have more than one account added to new Outlook, select the account you want to apply your email signature to.
- Select Add signature, then give it a distinct name.
- In the editing box below the new name, type your signature, then format it with the font, color, and styles to get the appearance you want.
- Use the checkboxes at the bottom to choose whether to apply the signature to new messages and to replies and forwards. Or leave them blank and add the signature you want when composing a message.
- Select Save when you’re done.
How to create and add an email signature in Outlook Classic?
- Open a new email message.
- On the Message menu, select Signature > Signatures.
- Depending on the size of your classic Outlook window and whether you’re composing a new email message or a reply or forward, the Message menu and the Signature button might be in two different locations.
- Under Select signature to edit, choose New, and in the New Signature dialog box, type a name for the signature.
- Under Edit signature, compose your signature. You can change fonts, font colors, and sizes, as well as text alignment. If you want to create a more robust signature with bullets, tables, or borders, use Word to create and format your signature text, then copy and paste it into the Edit signature box. You can also use a pre-designed template to create your signature. Download the templates in Word, customize with your personal information, and then copy and paste into the Edit signature box.
- Under Choose default signature, set the following options:
- In the E-mail account drop-down box, choose an email account to associate with the signature. You can have different signatures for each email account.
- You can have a signature automatically added to all new messages. Go to in the New messages drop-down box and select one of your signatures. If you don’t want to automatically add a signature to new messages, choose (none). This option does not add a signature to any messages you reply to or forward.
- You can select to have your signature automatically appear in reply and forward messages. In the Replies/forwards drop-down, select one of your signatures. Otherwise, accept the default option of (none).
- Choose OK to save your new signature and return to your message. Classic Outlook doesn’t add your new signature to the message you opened in Step 1, even if you chose to apply the signature to all new messages. You’ll have to add the signature manually to this one message. All future messages will have the signature added automatically. To add the signature manually, select Signature from the Message menu and then pick the signature you just created.
How can I get help with the NAU platform?
- Fill out the support form provided by FCT.
- Want to know more about NAU? Contact FCT!
- Learn + (Information provided by FCT).
How to register/create an account on the NAU platform?
- Access the NAU platform website.
- Click on “Register” in the upper right corner.
Fill in the required fields on the account registration form. - Click on “Create Account.”
After completing the above procedure, you must activate your account via email. - Note: If you do not receive the automatic email in your inbox, confirm that the information you entered is correct and/or check your Spam, Junk Mail, or Trash folder.
- Learn + (Informação da responsabilidade da FCT).
How do I submit answers to tests?
In single-question questionnaires/tests/quizzes, the questions are independent and there is a “Submit” button for each question. In questionnaires/tests/quizzes where answers are submitted collectively, the “Submit” button is located at the end of a set of questions.
The number of attempts for questionnaires/tests/quizzes depends on the course and its answer options. After submitting the answer, the platform will provide feedback on whether the answer is correct or incorrect, as well as the number of attempts used. If there is no limit on the number of attempts, the button will always be active.
- Learn + (Informação da responsabilidade da FCT).
How do I link my Citizen Card and digital mobile key?
Target Audience: Everyone
Answer/Solution:
- This association allows you to access NAU using the Gov Authentication service.
- Follow the instructions provided by FCT here.
Further information:
How to schedule a meeting from the calendar in Teams?
Atualizado/Updated: 2026-01-07
Target Audience: Iscte-IUL Community
Answer/Solution:
Novo calendário
- Select “Calendar
 ” in Teams.
 - Select a timeslot on the calendar or select “New
 “.
“. - Add meeting details and attendees.
- Enable the “Teams meeting” button.
- Select “Save
 “.
“.
- Select “Calendar
Calendário clássico
- Select “Calendar
 ” in Teams.
 - Select “New meeting
 “.
“. - Add meeting details and attendees.
- Make sure the “Online meeting” toggle is turned on.
- Select “Save
 “.
“.
- Select “Calendar
How to schedule a channel meeting in Teams?
Atualizado/Updated: 2026-01-07
Target Audience: Iscte-IUL Community
Answer/Solution:
- Select “Teams
 ” in Teams.
 - Select a team.
- Nexto to “Meet now
 “, select the dropdown arrow.
 - Select “Schedule a meeting
 “.
“. - Add other attendees.
- Select “Send“.
- Select “Teams
Tips:
- Everyone on the team you scheduled the meeting for will receive a personal invitation.
- You can also invite a channel to a regular meeting by typing the channel name in the Add channel field.
- Channels cannot be edited or added after the invitation has been sent. You will need to send a new invitation with the updated channel.
How to schedule a meeting in Teams from Chat?
Atualizado/Updated: 2026-01-07
Target Audience: Iscte-IUL Community
Answer/Solution:
- Select “Chat
 ” in Teams.
 - Select “More chat options
 ” at the top of the chat.
 - Select “Schedule a meeting
 “.
“. - Add meetings details.
- Select “Send“.
- Select “Chat
Is it possible to enrol a user in a course unit?
Atualizado/Updated: 2025-12-11
Target Audience: Iscte-IUL Teachers
Answer/Solution: Yes. Within the UC in Moodle, click on Participants » Enrol Users in the horizontal menu.

Enter the username or login and assign the right role.
Click the blue “Enrol Users” button.

Note: If the user is not registered in Moodle, they will not appear in the list of users.
Error in activating license in Amos and SPSS
Atualizado/Updated: 2025-10-28
Problem: If you receive this type of error when activating your IBM SPSS Statistics or IBM SPSS Amos license:
Authorization in progress … (***************)
Authorization failed.: Authorization Error
*** End Of Transaction.
One or more codes failed.
Click “Next” to license authorization via e-mail.
Resolution: Replace the “licenseactivator.jar” file located in the root folder of the software.
» Select your device’s operating system below and follow the steps to resolve the error.
- Close the SPSS/Amos software (it must not be running).
- Download the
licenseactivator.jarfile, which you can find here (just click on the licenseactivator.jar file or select the file and click on “Download”).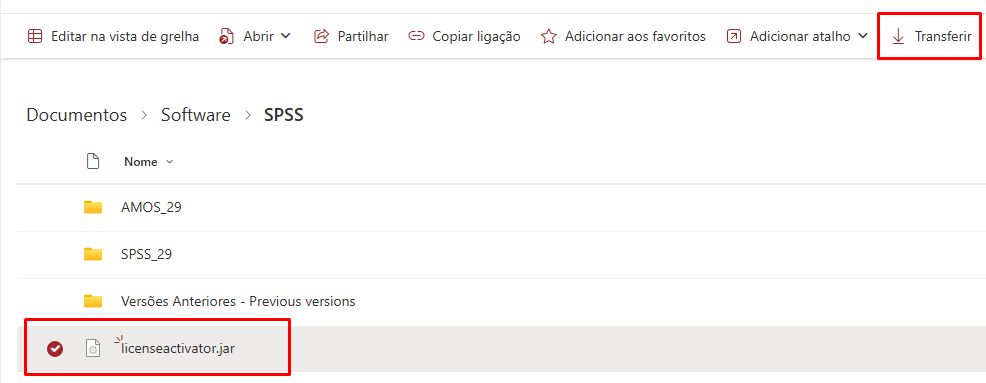
- Go to the folder where the program is installed. Open File Explorer (quick shortcut: Win + E).
Depending on the version installed, copy one of the paths below and paste it directly into the address bar at the top of the window:SPSS version licenseactivator.jar location 27 C:\Program Files\IBM\SPSS\Statistics\27 28 C:\Program Files\IBM\SPSS Statistics 29 C:\Program Files\IBM\SPSS Statistics AMOS version licenseactivator.jar location 27 C:\Program Files (x86)\IBM\SPSS\Amos\27 28 C:\Program Files\IBM\SPSS\Amos\28 29 C:\Program Files\IBM\SPSS\Amos\29 30 C:\Program Files\IBM\SPSS\Amos\30 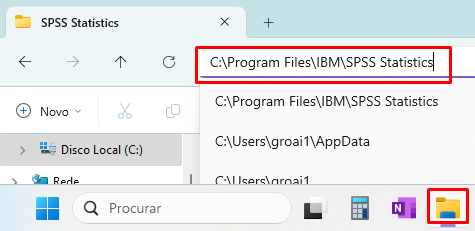
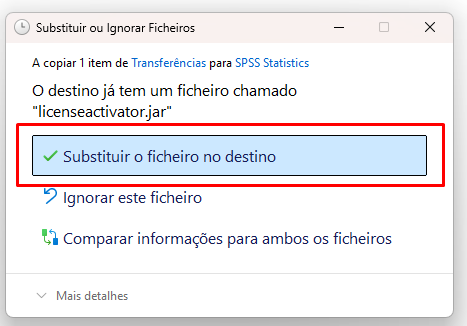
Example – SPSS Statistics - Copy the new file provided and paste it into the same folder, replacing the original.
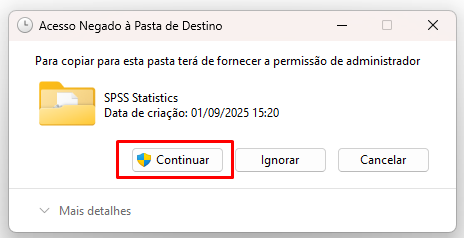
If a message appears asking for administrator permission, click Continue.
- Open IBM SPSS Statistics or IBM SPSS Amos.
- Re-enter the authorization code (code sent to activate the software license) and check that it works.
- Download the
licenseactivator.jarfile, which you can find here (just click on the licenseactivator.jar file or select the file and click on “Download”).
- Close all apps of the IBM SPSS Statistics software.
- Go to /Applications/IBM SPSS Statistics/SPSS Statistics.app
Right-click on the application icon

- Right-click on “Show Package Contents”
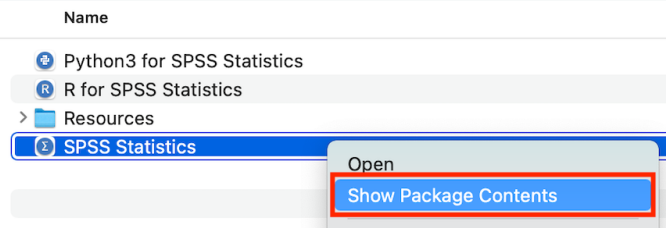
- Inside the Contents > bin folder, paste the downloaded licenseactivator.jar file and replace the old one.
- If a message pops up, confirm “Replace.”
- Open IBM SPSS Statistics.
- Re-enter the authorization code (code sent to activate the software license) and check if it works.
My camera isn’t working in Microsoft Teams
Atualizado/Updated: 2026-01-07
Target Audience: Iscte-IUL Community
Answer/Solution:
Check if your camera is in use
Close all other apps that might be using your camera (like Zoom or FaceTime).
If you’re using an external camera, try unplugging it and plugging it back in.
Try restarting your device.
Contact support from your device’s manufacturer in case it’s a hardware issue.
I can’t join a meeting in Microsoft Teams
Target Audience: Iscte-IUL Community
Answer/Solution:
You’re waiting in the lobby: Some organizers might place attendees in a lobby before admitting them into the meeting. Wait for someone to admit you, or reach out to the organizer directly to be let in.
Your internet browser isn’t supported: Teams doesn’t currently support Safari for Mac. If you’re joining a Teams meeting from the web, try joining from Microsoft Edge, Google Chrome, or other supported browsers.
Your internet connectivity is low: If your internet connection is low, you may not be able to join a Teams meeting right away. Try waiting for your connection to improve, joining from your supported mobile device, or reaching out to your internet provider.
Security policies for the meeting are preventing you from joining: If a meeting organizer enables end-to-end encryption for a meeting, you might have limited access to join. Try reaching out to the organizer to be let in.
Further Information:
How can I choose who can bypass the lobby?
Target Audience: Iscte-IUL Community
Answer/Solution:
As the meeting organizer, you get to decide who gets into your meetings directly, and who should wait for someone to let them in.
If you choose to have people wait, you (and anyone else allowed to admit people) will see a list of people in the lobby. From there you can choose whether to admit or deny them.
Who can bypass the lobby?
- Only organizers and co-organizers – As the meeting organizer, you and any co-organizers can get into the meeting directly.
- People who were invited – Anyone who receives the invitation, including those to whom it is forwarded, will join the meeting directly. If you don’t want people to forward the invite to others, turn off Allow Forwarding in the invitation.
- People in my org – Only people within your org can get into your meeting directly.
- People in my org and guests – People in your org and people with guest access can get into your meeting directly.
- People in my org, trusted orgs, and guests – Anyone from your organization and organizations with which your IT admin has set up a connection, or anyone joining as a guest, will be able to bypass the lobby.
- Everyone – Anyone who has access to the meeting link gets into the meeting directly, including people who call in.
Further Information:
How to invite people to a meeting in Teams?
Target Audience: Iscte-IUL Community
Answer/Solution:
- New calendar
- Select Calendar in Teams.
- Schedule an event or select an existing one and select Edit.
- In the Invite attendees field, enter who you want to add.
- Select + Optional to add optional attendees.
- Select Save.
- New calendar
- Classic calendar
- Select Calendar in Teams.
- Schedule an event or double-click an existing one.
- In the Invite attendees field, enter who you want to add.
- Select + Optional to add optional attendees.
- Select Save.
- Classic calendar
Further Information:
How to Create Breakout Rooms in Teams?
Atualizado/Updated: 2025-07-25
Target Audience: Iscte-IUL Community
Answer/Solution:
To create breakout rooms, you must be a meeting organizer or a presenter in the meeting organizer’s organization who’s been appointed a breakout rooms manager.
Before a meeting
If you create breakout rooms before a meeting starts, you can invite up to 300 people. As soon as the meeting starts, you can open the breakout rooms.
- Select Calendar in Teams.
- Double-click a meeting to expand its details.
- Select Breakout rooms > Create rooms.
- Choose the number of rooms you want (up to 50).
- Select Add rooms.
- Select Assign participants.
- Choose how you want participants to be assigned.
- Select Next > Save.
During a meeting
- Select Rooms in the meeting controls.
- Choose the number of rooms you want to create (up to 50).
- Choose how you want participants to be assigned.
- Select Create rooms.
Tip: To add another breakout room during the meeting, select Rooms > Add room in the meeting controls.
Further Information:
How to Add Co-Organizers to a Meeting in Microsoft Teams?
Target Audience: Iscte-IUL Community
Answer/Solution:
- New calendar
- Select Calendar inTeams.
- Select an event.
- Make sure the people you want to add as co-organizers are added as required attendees.
- Select Edit > More options.
- In Event, select Meeting options.
- In Roles > Choose co-organizers, search and select their names from the dropdown menu.
- Select Save.
- New calendar
- Classic Calendar
- Select Calendar inTeams.
- Select a a meeting or event.
- Make sure the people you want to add as co-organizers are added as required attendees.
- Select Edit.
- In the meeting description, press and hold ctrl and select Meeting options.
- In Roles > Choose co-organizers, search and select their names from the dropdown menu.
- Select Save.
- Classic Calendar
Note: Co-organizers must be in the same org as the meeting organizer. They can also use a guest account in the same org.
Further Information:
