The process for activating Iscte account has recently changed.
To activate your Iscte account, please visit our page: Activate account – Iscte-SIIC (iscte-iul.pt).
News
Iscte will start adopting multi-factor authentication (MFA), which is a method by which a user confirms their identity through two or more successfully presented proofs. In the case of ISCTE, we consider the username and password to be the first authentication factor. The choice of the second factor will be up to the user, who can choose between:
- OKTA Verify application (Recommended)
- Google Authenticator app or other TOTP-compatible app
- Security Key or Biometric Authenticator
In order to activate the second factor, you must first confirm your identity at https://identity.iscte-iul.pt
Configuration instructions can be found on the SIIC website at https://siic.iscte-iul.pt/en/mfa-2/
The VPN service has been restored at the usual address https://vpn.iscte-iul.pt and access to the service will require MFA configuration.
If you have any questions, you can contact the services via https://iajuda.iscte-iul.pt or by phone at 210 464 010 (or ext. 291000) during the hours of 9:00 a.m. to 6:00 p.m.
1. Go to https://takeout.google.com and log in with your Iscte credentials (e.g., xxnes@iscte-iul.pt and your password).
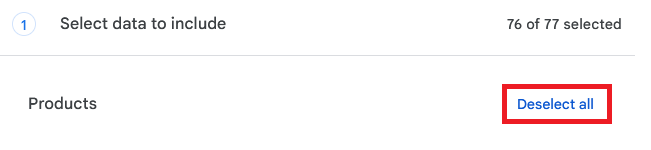
2. By default, all Google products are selected.
3. Under Select data to include,, click Deselect all.
4. In the product list, locate and select the Google Photos.
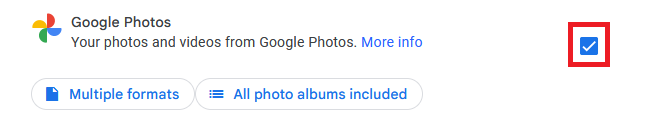
5. At the end of this step, click Next step.
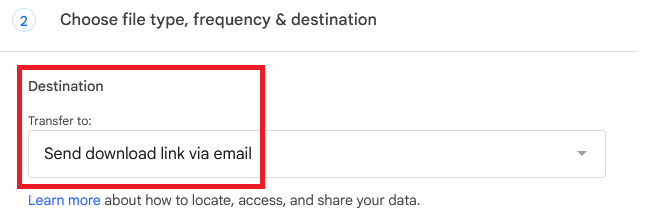
6. Under Choose file type, frequency & destination, set the following options:
Destination: Send download link via email
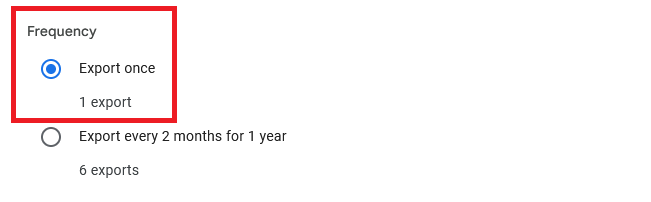
Frequency: Export once
File type: .zip (recommended)

7. At the end of this step, click Create export.
⚠️ Once the export is complete, you’ll receive an email with a link to download the files, which is valid for 7 days. If the link expires, you’ll need to create a new export in Google Takeout.
Best practices in Microsoft Teams focus on maintaining organization, security, and efficient communication.
How to Organize Work in Microsoft Teams?
- Create Teams by Project
Each project should have its own Team in Microsoft Teams. This keeps all files, channels, and meetings organized in one place.
- Use Topic-Based Channels
Within each Team, create separate channels for specific subjects (e.g., General, Planning, Operations, Design). This prevents mixed conversations and makes information easier to find.
For more details on Teams and Channels, visit Microsoft Support here.
Organized Communication
- Avoid side conversations in meeting chat
Use the meeting chat only when necessary. Stay focused on the meeting to avoid missing important information.
- Post messages in the correct channel
If the topic belongs in the Design channel, do not post it in General. This helps the entire team follow the conversation history.
Meeting Best Practices
- Always join with your microphone on Mute
This helps prevent unwanted noise and interruptions. Turn your mic on only when you speak.
- Use video whenever possible
Video improves communication and team interaction. It helps maintain engagement and team connection.
- Use the Raise Hand feature
To avoid interrupting others, use the “Raise Hand” function.
Notification Management
- Adjust notifications to avoid distractions
Go to: Settings > Notifications
Mute less relevant teams or channels.
Enable only the alerts that truly matter.
For more information on Notification Management, visit Microsoft Support here.
Files and Collaboration
- Use Teams to collaborate on documents
Open documents directly in Teams.
Multiple people can edit simultaneously.
This prevents duplicate file versions.
- Always store files in the correct channels
Use the Files tab in each channel.
This ensures everyone knows where to find what they need.
For more information on Files and Collaboration, visit Microsoft Support here.
Quick Search
- Use the search bar at the top
You can search for: People, Messages, Files, Channels.
Type keywords to quickly find what you need.
Final Tips
- Use @mentions to get someone’s attention
- Enable only essential notifications
- Keep your Team organized
- Participate actively in meetings
Learn more…
(content from external sources provided by Microsoft)
![]() Microsoft Teams: The Best Practices You NEED To Know
Microsoft Teams: The Best Practices You NEED To Know
![]() How to share files safely in Microsoft Teams chat
How to share files safely in Microsoft Teams chat
![]() Keep your meeting content secure
Keep your meeting content secure
![]() 3 Tips for Collaborating in Group Chat in Microsoft Teams
3 Tips for Collaborating in Group Chat in Microsoft Teams
![]() Microsoft Teams: The Ultimate Guide for Meetings & Collaboration
Microsoft Teams: The Ultimate Guide for Meetings & Collaboration
![]() How to make meetings more accessible and inclusive
How to make meetings more accessible and inclusive
![]() How to use Whiteboard in Meetings
How to use Whiteboard in Meetings
![]() How to use Collaborative Annotations in a meeting
How to use Collaborative Annotations in a meeting
![]() Tips for safe and effective meetings
Tips for safe and effective meetings
Visit the training modules we have prepared (based on external content provided by Microsoft)
- Faculty: Hybrid Teaching
- Staff: Communication and Productivity
- Students: Basic Concepts
Need help?
Protect your information, control access, and ensure secure meetings on a daily basis.
How does Microsoft Teams protect your information?
Microsoft Teams was developed to facilitate collaboration without compromising information security and user privacy. The platform integrates automatic and configurable features that protect data, files, and meetings.
- Data protection
Messages, files, and meetings are encrypted in transit and at rest, ensuring the confidentiality of information.
To learn more about compliance and data protection in Microsoft 365, see the official Microsoft documentation here.
- Access control
Only authorized users can access teams, channels, and meetings. It is possible to define who can share content, record meetings, or admit participants.
- Meeting security
Features such as waiting rooms, participant control, and recording options help keep meetings secure and under control.
- Compliance and privacy
Microsoft Teams complies with international security and privacy standards, including GDPR, ensuring responsible use of personal data.
To learn more about privacy and data usage by Microsoft, see the Microsoft Privacy Statement here.
How to check if a meeting is secure?
- Check app permissions
- Confirm permissions for Camera, Microphone, and Notifications.
- On mobile devices, check permissions in System Settings → Applications → Teams.
To learn more about meeting options in Microsoft Teams, see Microsoft support here.
- Ensure secure file sharing
- Files are stored securely in OneDrive/SharePoint with encryption.
- When sharing, set appropriate permissions: Can view, Can edit, or Block download.
- Avoid sharing sensitive data in public channels.
To learn more about sharing files in Microsoft Teams, see Microsoft support here.
- Safe meetings
Before starting the meeting, open Meeting options and adjust:
- Lobby: control who can join.
- Who can present: we recommend Specific people.
- Microphone and camera: disable by default for participants.
- Green Room: enable the waiting room in “Production tools” and prepare audio/video before starting the meeting.
- Manage what attendees see: to control the content displayed.
To learn more about configuring large meetings and events, check Microsoft Support here.
Best practices for users
- Always review Meeting options before starting.
- Send invitations only to necessary participants.
- Avoid sharing meeting links or sensitive data in public channels.
- Confirm file‑sharing permissions before sending.
- Enable Multi-Factor Authentication (MFA) for your organizational account.
- Be cautious of unexpected calls or links.
- Keep Teams always up to date.
Learn more…
(content from external sources provided by Microsoft)
![]() How to share files safely in Microsoft Teams chat
How to share files safely in Microsoft Teams chat
![]() Keep your meeting content secure
Keep your meeting content secure
![]() 3 Tips for Collaborating in Group Chat in Microsoft Teams
3 Tips for Collaborating in Group Chat in Microsoft Teams
![]() Microsoft Teams: The Ultimate Guide for Meetings & Collaboration
Microsoft Teams: The Ultimate Guide for Meetings & Collaboration
![]() How to make meetings more accessible and inclusive
How to make meetings more accessible and inclusive
![]() How to use Whiteboard in Meetings
How to use Whiteboard in Meetings
![]() How to use Collaborative Annotations in a meeting
How to use Collaborative Annotations in a meeting
![]() Tips for safe and effective meetings
Tips for safe and effective meetings
Visit the training modules we have prepared (based on external content provided by Microsoft)
- Faculty: Hybrid Teaching
- Staff: Communication and Productivity
- Students: Basic Concepts
Need help?
Fast communication, secure file sharing, and document co-authoring, promoting an efficient and inclusive environment.
How does it work?
- Collaboration is organized through teams.
- Each team is managed by owners, who are responsible for configuration and management, while members participate in conversations and activities.
- Within teams, there are channels, which are dedicated spaces for collaboration.
- This structure ensures fast communication, secure file sharing, and document co-authoring/reviewing, promoting an efficient and inclusive environment.
Roles in Teams
- Owners: Manage the team (add/remove members, set settings).
- Members: Participate in conversations, meetings, and collaborate on files.
Types of Teams
- Public: Any Iscte’s Employee can join.
- Private: Only invited members have access.
Channels
- Standard: Visible to all team members.
- Private: Only for specific members within the team.
- Shared: Allow collaboration with people outside the team or organization.
Key Features
- Conversations, files, and notes are visible only to team members.
- Tabs at the top of the channel link to favorite files, apps, and services.
- Teams can be dynamic (projects) or ongoing (services/schools/departments).
Files
Upload and share files stored in your OneDrive, channels, and chats, or on your device. Send the file itself or a link to it.
Attach a file in a channel
- Select the channel where you want to attach files.
- In the channel, in a message box, select “Actions and apps“. Select how you want to attach the file:
- Recent: Attach one of the five most recently used files.
- From your device: Choose a file that was created on the device you are currently using.
- Attach a file in the cloud: Attach a file from OneDrive or SharePoint.
- Browse teams and channels: Choose a file stored in a channel.
- Upload from this device: Upload files from your device.
- Select a file.
- Add an optional message and @mention someone in your post.
- Select “Send“.
Upload one or more files to the “Files” tab
All channels have a “Files” tab.
- Select the channel where you want to upload the file.
- Select the “Files” tab.
- Select “Upload” > “Files, Folder, or Template“.
- Choose the file(s).
Share a file from OneDrive
- Select OneDrive in Teams.
- Go to “My Files“.
- Hover over the file you want to share and select “Share“.
- Do one of the following:
- Select “Copy link” to get a link you can paste into a chat or email.
- Select “Share settings” to specify the people and their permissions for accessing the file.Or
- Add a name, group, or email address.
- Select a permission such as “Can edit“, “Can review“, “Can view” ou “Cannot download“.
- Add a message (optional).
- Select “Apply“.
- Select “Send“.
Share a file in a channel or chat
- Select a channel or chat message.
- n the compose box, select “Actions and apps” > “Attach file“.
- Select a file and add an optional message.
- Select “Send“.
Add Apps to Teams
Think about the tools, files, and dashboards you already use. Many of them can be added directly to Teams.
Add relevant files and apps to tabs in any chat or channel.
You can also add apps to meetings to help you collaborate better with participants.
- Select “Add a tab” at the top of a chat, channel, or calendar event.
- Select or search for an app to add.
Insert app content into Teams messages
- Select “Actions and apps” on the right side of the message composition box.
- Select an app from the suggestions, search for an app in the “Search” box, or select “Get more apps” to browse the full app library.
- Follow the instructions to add the app.
- Once added, the app icon appears next to the message formatting options.
- To insert app content into a message, select the app icon and follow the instructions for that specific app.
Interact with bots
Bots can contribute to channel and group conversations, such as providing important updates or helping a team organize their work.
- Type @ and the bot’s name in the text box.
- Chat with Chat with the bot and use it to assign tasks, reminders, or any other task.
Learn more…
(content from external sources provided by Microsoft)
![]() 3 Tips for Collaborating in Group Chat in Microsoft Teams
3 Tips for Collaborating in Group Chat in Microsoft Teams
![]() Microsoft Teams: The Ultimate Guide for Meetings & Collaboration
Microsoft Teams: The Ultimate Guide for Meetings & Collaboration
![]() How to make meetings more accessible and inclusive
How to make meetings more accessible and inclusive
![]() How to use Whiteboard in Meetings
How to use Whiteboard in Meetings
![]() How to use Collaborative Annotations in a meeting
How to use Collaborative Annotations in a meeting
![]() Tips for safe and effective meetings
Tips for safe and effective meetings
Visit the training modules we have prepared (based on external content provided by Microsoft)
- Faculty: Hybrid Teaching
- Staff: Communication and Productivity
- Students: Basic Concepts
Need help?
Prepare for and participate in live events.
How to plan and schedule a live event?
To create a live event in Teams:
- Select “Meetings” > “New meeting“.
- At the top of the dialog box, select “New meeting” > “New live event“.
- Add the meeting title, date and time information, and other details.
- In the “Invite people to your event group” box, add the names of the people who will be presenting and producing the event.
- Select “Next“.
- Under “Live event permissions“, choose who can attend your live event.
- Make selections under “How do you plan to produce your event?“.
- Select “Schedule“.
- Select the “Get attendee link”, to copy the unique code. This is what you post or send to anyone attending the event.
Note: Once the event is scheduled, be sure to make any changes in Teams. Don’t edit this event in Outlook.
- To learn more about planning and scheduling a live event, see Microsoft support here.
How to produce a live event?
The producer’s screen has three areas. What’s live is on the right side. On the left, the “Queue” shows you what’s next, and the bottom tray has all the content you can share.
Note: Live events are currently only available on Teams for web.
- Select “Calendar“, select the live event, and “Join”.Note: You can only join as a producer if you’re the organizer or have been assigned this role.
- To share your desktop or a window, select “Share” and add the content you’d like to share.
- Select what content you want your audience to see from at the bottom of the screen to preview it in your queue (on the left) before sending it to what’s live (on the right).
- Select “Send live” to move a feed from the preview queue to live.
- Select “Start” to start broadcasting.
- To learn more about planning and scheduling a live event, see Microsoft support here.
How to attend a live event?
- Select the live event link.
- You’ll see different instructions based on how you join the event (like from the Teams app or the web). Sign in or select “Join anonymously“.
Note: If the live event hasn’t started, you’ll see the message “The live event has not yet started“.
- There are controls at the bottom of your screen to pause the action, adjust volume and the video quality.
- To watch the event again, use the same link to see a recording.
How do I ask questions during a live event?
The “Q&A” panel only appears only if organizers have set it up. To ask a question.
To ask a question:
- Select “P&R“, on the right side of the screen.
- Type your question in the compose box, and then select “Send“. SIf you want to ask your question anonymously, select “Ask anonymously“.
- To learn more about participating in a live event, see Microsoft support here.
How to moderate a Q&A session?
When a live event is created with a “Q&A” option, attendees can start asking questions even if the event hasn’t started. These questions are only visible to moderators until they publish them to the event.
- Select “Q&A” on the right side of the screen, then select “Open”.
- Select “Publish” to make the question and answer visible to everyone. Select a question and choose “Private reply” to respond to it. The answer is instantly available to the person who asked the question.
- Producers and attendees can like questions by selecting the thumb icon.
- If you want to say something to all in chat, type an announcement at the bottom of the panel and select “Send”.
- When you’re event is over, you can download reports including a “Q&A report” by selecting the “menu” button on the live event invite.
- To learn more about moderating a Q&A session, see Microsoft Support here aqui.
Learn more…
(content from external sources provided by Microsoft)
![]() Microsoft Teams: The Ultimate Guide for Meetings & Collaboration
Microsoft Teams: The Ultimate Guide for Meetings & Collaboration
![]() How to make meetings more accessible and inclusive
How to make meetings more accessible and inclusive
![]() How to use Whiteboard in Meetings
How to use Whiteboard in Meetings
![]() How to use Collaborative Annotations in a meeting
How to use Collaborative Annotations in a meeting
![]() Tips for safe and effective meetings
Tips for safe and effective meetings
Visit the training modules we have prepared (based on external content provided by Microsoft)
- Faculty: Hybrid Teaching
- Staff: Communication and Productivity
- Students: Basic Concepts
Need help?
Register participants, conduct interactive presentations, and analyze participant data to achieve more effective meetings.
How to schedule a Webinar?
- In Teams, select “Calendar” .
- select the arrow next to “New meeting”.
- Select “Webinar”.
- Enter the webinar details e select “Save”.
- Select Publish site when you’re ready to publish your changes.
To learn more, see Microsoft support here.
Details for presenters and organizers
- Follow the steps above.
- On the webinar scheduling form, go to “Configuration” > “Details”.
- In the “Co-organizers” section, invite people to help organize the event.
- Under “Presenters from your organisation”, invite speakers from Iscte. Select “Add external presenters” to invite speakers from other organisations.
- Select “Save and send invites”.
To learn more about customising a webinar, see Microsoft support here.
Registration form for participants
The details on the form will be seen by everyone invited to the webinar.
- Follow the steps described in “How to schedule a Webinar?”.
- Add the Webinar details and select “Save“.
- Select “Registration“ > “Configuration“.
- Under “Registration requirements“, set the event capacity, adjust registration requirements, and add form fields.
- Select “Save“.
To learn more about managing webinar recordings, see Microsoft support here.
Who can manage Q&A sessions
By default, only organizers and co-organizers can manage Q&A in meetings. In assemblies and webinars, presenters can also take on this role.
To change who can manage Q&As in a meeting or webinar, follow these steps:
- Select “Calendar ” in Teams.
- Open the town hall or webinar details.
- Select “Meeting options “.
- Select “Engagement “.
- Choose an option from the “Who can manage Q&A ” dropdown menu.
- Select “Apply“.
- To learn more about Q&A sessions, see Microsoft support here.
Learn more…
(content from external sources provided by Microsoft)
![]() Microsoft Teams: The Ultimate Guide for Meetings & Collaboration
Microsoft Teams: The Ultimate Guide for Meetings & Collaboration
![]() How to make meetings more accessible and inclusive
How to make meetings more accessible and inclusive
![]() How to use Whiteboard in Meetings
How to use Whiteboard in Meetings
![]() How to use Collaborative Annotations in a meeting
How to use Collaborative Annotations in a meeting
![]() Tips for safe and effective meetings
Tips for safe and effective meetings
Visit the training modules we have prepared (based on external content provided by Microsoft)
- Faculty: Hybrid Teaching
- Staff: Communication and Productivity
- Students: Basic Concepts
Need help?
Enhance and customize your meeting experience in Teams.
Scheduling Classes and Lectures
When scheduling online classes or lectures, apply the default settings:
- Class → ideal for groups, with permission control (teacher as presenter, students as participants). How?
- Select “Calendar” in Teams.
- Select “New” + > “Class”.
- Add the meeting title, start and end times, and other details.
- Select “Save” after adding all the meeting details.
- Lecture (seminar) → for presentation sessions, where only presenters speak and participants are in audience mode. How?
- Select “Calendar” in Teams.
- Select “New” + > “Lecture”.
- Add the meeting title, start and end times, and other details.
- Select “Save” after adding all the meeting details.
- Class → ideal for groups, with permission control (teacher as presenter, students as participants). How?
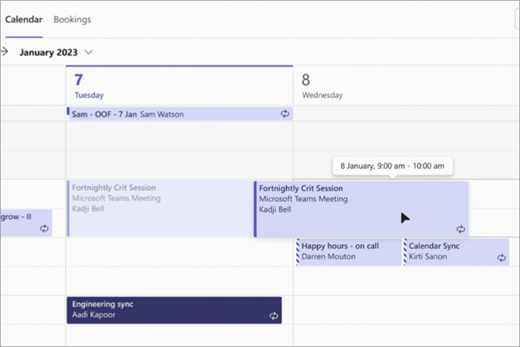
Reschedule a meeting
Reschedule meetings and events from your Teams calendar. To quickly update a meeting time, select it in your Teams calendar, drag it to a new time, and drop it.
You will be notified of guests’ availability before updating the meeting time.
You can also change the meeting time by opening the meeting details, choosing a new time, and selecting “Send update.” Participants will automatically receive a notification with the updated time.
Change the “Show as” status
As the organizer, you can set the “Show As” status of the meeting in the action bar. When participants RSVP (a tool that allows them to confirm their attendance at meetings and events within Teams), their status will automatically reflect the status set by the organizer. To set the “Show as” option:
- Select “Show as” in the meeting details.
- Select the status you want participants to have while they are in your meeting.
Tips:
- Participants can choose a different “Show as” status by right-clicking on the meeting in their Teams calendar, hovering over “Show as” and selecting a status.
- The default value for the “Show As” status for all meetings is “Busy”.
Presenter controls
The toolbar is only visible to the person presenting.

- Drag handle: Select and hold the toolbar drag handle to move the presenter toolbar. This will keep it from blocking important parts of your screen. Release the drag handle when you’ve placed it in the right area.
- Camera: Turn the camera on/off.
- Mic: Turn the mic on/off.
- Give control: Let someone access and interact with your screen. While they have control, they can make selections, edits, and other modifications on your shared screen.
- Take back: If you gave someone control, select “Take back” when you’re ready to take back control.
- Share audio: To stream audio from your device to meeting participants through Teams. All sound from your computer, including notifications, will be audible in the meeting.
- Optimize: To prevent choppiness or lag while sharing video content.
- Layout:
- Content only: participants will see your content and video feed.
- Standout: this blocks your background and helps you stand out in your video feed.
- Side-by-side: the user and another participant will be placed side-by-side in the meeting window.
- Annotate: to lock what’s on your screen while you and other people draw or add notes over the content.
- Chat: to view and participate in a compact view of the meeting chat while you’re presenting content. Your audience won’t see the chat window in your shared screen.
- People: While you present, a minimized meeting window will appear next to your shared content. Select “People” to see other people in your meeting.
- Stop sharing: to stop sharing your screen and return to the main meeting window.
- Pin: to keep the toolbar in the place you’ve positioned it.
Use PowerPoint Live
PowerPoint Live in Teams helps presenters give their audience an inclusive, engaging experience. It combines the best parts of presenting in PowerPoint with the collaboration of a Microsoft Teams meeting.
- Presenters have a unique view that lets them control their presentation while staying engaged with their audience.
- Audience members can go through slides on their own without affecting the live presentation. They can also customize their viewing experiences with captions, high-contrast slides, and translated slides.
- See how
 here.
here.
Record a meeting
Start recording
To start a meeting recording:
- Start or join the meeting.
- ii. In your meeting controls, select “More actions ” > “Record and transcribe ”> “Start recording ”.
- Select “Confirm”.
Tips:
- Recording continues even if the person who started the recording leaves the meeting.
- The recording stops automatically once everyone leaves the meeting. If someone forgets to leave, the recording will end and automatically restart every four hours until the last participant leaves the meeting.
- If one of the participants has a policy for compliance recording, the meeting will be recorded according to the policy even if that participant is from another org.
To record audio only:
- Select “More actions ” in your meeting controls.
- Select “Record and transcribe ”> “Start recording ”.
- From the “Choose what to record” dropdown menu, select “Audio only”.
- Select “Confirm”.
Stop recording
- a. In the meeting controls, select “More actions ” > “Record and transcribe ”.
- Choose one of the following:
- “Stop recording” to stop the recording and live transcription.
- “Stop transcription” to stop the live transcription only. The recording will continue until you select “Stop recording”.
Find recordings
- The recording is processed and saved in the meeting organizer’s OneDrive.
- When a recording becomes available, the meeting organizer will receive an email. The recording will be posted in the meeting chat or channel
- Guests and external participants can only view the recording if it is explicitly shared with them
Choose who can record and transcribe
- Organizers, co-organizers, and presenters.
- To choose who can record and transcribe – Classic calendar:
- i. Select “Calendar” in Teams.
- i. Select a meeting or event.
- i. Select “Edit”.
- iv. In the meeting description, press and hold “Ctrl” and select “Meeting options”.
- In “Recording and transcription”, choose your preference in the “Who can record and transcribe” dropdown menu.
- Select “Save”.
Tip: People from other organizations, guests, and anonymous users cannot start or stop recording.
Privacy
- All meeting participants will receive a notification in their Teams desktop, web, or mobile app as soon as a meeting recording starts.
- The meeting organizer automatically owns the recording. By default, only meeting organizers and co-organizers can download or delete the recording.
Learn more…
(content from external sources provided by Microsoft)
![]() Microsoft Teams: The Ultimate Guide for Meetings & Collaboration
Microsoft Teams: The Ultimate Guide for Meetings & Collaboration
![]() How to make meetings more accessible and inclusive
How to make meetings more accessible and inclusive
![]() How to use Whiteboard in Meetings
How to use Whiteboard in Meetings
![]() How to use Collaborative Annotations in a meeting
How to use Collaborative Annotations in a meeting
![]() Tips for safe and effective meetings
Tips for safe and effective meetings
Visit the training modules we have prepared (based on external content provided by Microsoft)
- Faculty: Hybrid Teaching
- Staff: Communication and Productivity
- Students: Basic Concepts
Precisa de ajuda?
We are unifying collaboration at Iscte. Microsoft Teams will become the institutional tool for meetings, chat, and file sharing.
Why we’re changing?
Teams integrates with our Microsoft 365, simplifying scheduling via Outlook, meeting access, persistent chat, and document co-editing — all in one place.
What changes for you?
Everything you did in Zoom has an equivalent in Teams. Gain integration and fewer manual steps.
Main Features and Functionalities
- Chat and Communication: Teams offers persistent group and individual chat.
- Meetings and Videoconferencing: Allows scheduling and hosting online meetings with audio and video, screen sharing, and features like whiteboard and captions.
- File Collaboration: Teams makes it easy to share and collaborate on Office 365 documents such as Word, Excel, and PowerPoint, as well as other file types.
- App Integration: Teams integrates various apps like OneNote, Planner, and third-party applications, expanding its capabilities.
- Channels: Teams organizes communication into channels, enabling focused discussions on specific topics or projects within a team.
Let’s get started!
- If you don’t have the app yet, choose your preferred store to install it.


- Launch Teams and sign in using your Iscte account credentials (e.g., xxnes@iscte-iul.pt and the corresponding password).
- a. On Windows, click “Start
 ” > Microsoft Teams
  .
. - On Mac, go to the “Applications” folder and click Microsoft Teams .
- On mobile devices, tap the Teams icon .
- a. On Windows, click “Start
- Join a Teams meeting from the app.
- Select “Calendar
 ” in Teams.
 - Choose a meeting and click “Join”.
- On the pre-join screen, adjust camera and microphone settings.
- Click “Join now”.
- Select “Calendar
- Schedule a meeting in Teams from the app.
- Go to your “Calendar ” in Teams.
- Click “New meeting” + .
- Add the meeting title, start and end times, and other details.
- Enter names in the “Add required attendees” field to invite participants.
Tip: Select “Scheduling Assistant” to check everyone’s availability in a calendar view. - Click “Save” after adding all meeting details.
- Go to your “Calendar
Learn more… (content from external sources provided by Microsoft)
Access the training modules we have prepared (based on external content provided by Microsoft)
- Faculty: Hybrid teaching
- Staff: Communication and Productivity
- Students: Basic Concepts